How To Remove Battery From Asus Laptop: Easy Fix 2023
To remove a removable battery from your Asus laptop, start by turning off the computer and unplugging it from the power source. Then, flip the laptop over and locate the battery compartment.
Slide the latches, unlock the padlock to release the battery, and gently lift it out of the compartment.
Step 1: Turn off your laptop and unplug it from the power source
As we venture into this task, the very first step is a simple yet critical one: powering off our Asus laptop and disconnecting it from any power source. Doing so will ensure our safety during the removal process as well as protect the computer’s components from accidental damage.
It’s not just about pulling out the charging cable; make sure to shut down your system entirely before proceeding. In short, it lays a safe foundation for us to work on removing or replacing our Asus laptop battery in subsequent steps.
Step 2: Flip your laptop over and locate the battery compartment
Let’s get to the heart of the matter. After ensuring our Asus laptop is off and unplugged, we’ll need to flip it over to reveal its underbelly. This part is simple yet critical in removing the battery from an Asus laptop.
Next, our eyes should be on locating the battery compartment. It might seem like a daunting task at first but fear not! On most Asus laptops, this will be noticeably separate from other compartments as it usually covers a larger portion of the back panel.
Spotting this piece can significantly simplify your laptop battery removal process. It’s all about understanding your device!
Step 3: Slide the latches or unlock the padlock to release the battery
On most Asus laptops, battery removal involves an easy push-slide mechanism or a lock. Locate these latches or locks on the underside of your laptop. They’re typically near the battery compartment.
We’ll want to carefully slide them or flip them into an unlock position, depending on the design of your specific model. Doing so will allow for the seamless and effortless release of the battery from its compartment.
Be sure to keep our movements gentle to avoid any potential damage to the latches or locks during this essential step in our Asus laptop battery removal guide.
Step 4: Gently lift the battery out of the compartment
To remove the battery from your Asus laptop, gently lift it out of the compartment. Be sure to hold the battery securely and avoid dropping or mishandling it. It’s important to be cautious during this step to prevent any damage or injury.
Once the battery has been lifted out, you can proceed with either disposing of it properly if it is old or defective or replacing it with a new one if necessary. Remember to follow the reverse steps when installing a new battery and ensure that it is properly connected and secured in place before using your laptop again.
Removing a Non-Removable Battery from Asus Laptop
Removing a non-removable battery from your Asus laptop may seem challenging, but with the right tools and steps, it can be done smoothly. Let me walk you through the process.
Step 1: Turn off the laptop and unplug it from the power source
To remove the battery from your Asus laptop, the first step is to ensure that your laptop is turned off and unplugged from the power source. This is an important safety precaution to prevent any electrical mishaps or damage while handling the battery.
Once you have ensured that your laptop is powered down and disconnected from any power supply, you can proceed with removing the battery.
By following these steps, you can safely remove the battery from your Asus laptop without causing any harm to yourself or your device. Remember to always handle the battery with care and dispose of it properly according to local regulations.
Step 2: Flip the laptop over and locate the battery compartment
To remove the battery from your Asus laptop, you’ll need to flip it over and locate the battery compartment. This is usually located on the bottom of the laptop. Look for a latch or a panel that can be slid open or unlocked with a small padlock symbol.
Once you’ve found it, gently slide open the latch or unlock the padlock to access the battery compartment. It’s important to handle your laptop carefully during this process to avoid any accidental drops or damage.
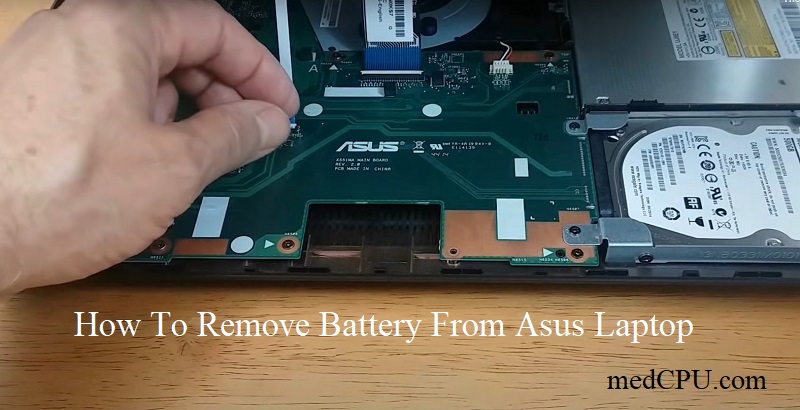
Step 3: Use a screwdriver to remove the screws securing the battery
To remove the screws securing the battery, you will need a screwdriver. First, ensure your laptop is turned off and unplugged from the power source. Then, flip the laptop over and locate the battery compartment.
Using the appropriate size screwdriver, carefully unscrew each of the screws securing the battery in place. Be sure to keep track of these screws so that they can be reinserted later when installing a new battery.
Once all screws are removed, gently disconnect any cables or connectors attaching the battery to the motherboard. Finally, you can safely lift the old battery from its compartment.
Step 4: Disconnect the battery cable from the motherboard
After sliding the latches or unlocking the padlock to release the battery, it’s time to disconnect the battery cable from the motherboard. Locate the cable connected to the battery and gently detach it by carefully pulling it straight out of its socket.
Be cautious not to pull on the wires themselves but rather on the connector itself. This step ensures that there is no electrical connection between your laptop and its old battery, thereby enabling you to safely remove and replace it.
Remember, handling these delicate components with care is essential to avoid any damage during this process.
Step 5: Carefully lift the battery out of the compartment
To safely remove the battery from your Asus laptop, follow these steps. Once you have disconnected the battery cable from the motherboard in Step 4, it’s time to carefully lift the battery out of the compartment.
Make sure you grip it firmly but gently from the sides to avoid damaging any internal components or connectors.
Slowly pull up the battery and ensure that no cables or wires are caught underneath. If you encounter any resistance, double-check if there are any remaining screws securing the battery in place that may require removal.
Once free, continue lifting until it is completely removed from its compartment.
Conclusion
Removing the battery from your Asus laptop is a simple process that can be done in a few easy steps. Whether you have a removable or non-removable battery, it’s important to follow the proper procedures to avoid any damage.
By following our guide, you’ll be able to remove and replace your Asus laptop battery with ease, ensuring optimal performance for years to come. Take care of your laptop by properly maintaining its battery – it’s an essential component that powers your device!
Related Posts:
- My Asus Laptop Won’t Connect To Wifi: How to Fix?
- How To Turn On Asus Laptop Keyboard Light
- How To Charge An Asus Laptop Without A Charger

Eyal Ephrat serves as the co-founder and CEO of medCPU.com, where technology is making significant strides in the field of medicine. Through his experience in purchasing PC and laptop equipment and various other tech products, Eyal Ephrat contributes valuable insights to medCPU’s mission.