In this blog post, we will discuss how to remove hard drive from laptop. There are many reasons why you may need to do this. For example, if your computer won’t start up because the hard drive has failed or is not working properly anymore. If you have an older laptop with a spinning disc and no solid-state drive (SSD), replacing the hard drive could likely improve its performance.
Medcpu will show you how to do it step by step and give you some useful information about laptop hard drive parts and recover lost data after hard drive removal. Let’s dive in!
Is It Safe to Remove Hard Drive from Laptop?
It’s safe. Although there is some risk, it is deficient if you follow the steps. As you might expect, removing your laptop’s hard disk has little to do software-wise. Throughout the entire process, you will need to handle hardware. This involves a lot more screwing and unscrewing, so be prepared to channel your inner handyman.
Open your laptop and take out the hard drive. It doesn’t matter how many drives you have. The process of removing the hard drive should be done with care.
It is essential NEVER to remove it from the system while it is running. If you decide to take it out with the power on and for any other reason than logic, the drive could be exposed to static electricity. This could cause the contents of your drive to explode (not a joke!). Static electricity can easily be transmitted from your body to the fragile electronic parts of the drive. You could burn the sectors of the drive, causing irreparable damage. It seems a bit crazy, doesn’t it? It’s not. This is just the truth.
This is not an attempt to scare you. It’s just a warning that there may be times when your drive must be removed.
- If you are running out of space or need more, a larger drive is the best option.
- The drive has been damaged and must be replaced.
- You have several hard drive slots on your system and want to add more. Modern laptops have both SSD and HDD slots.
- If you want to use the drive as a backup, remove it from your system and replace it with another.
- You want to upgrade to an advanced and new hard drive.
Ways to Remove Hard Drive from Laptop
Step 1: Back-up your files
Back-up all important files before you take out the hard drive. Backups can be made using an external hard disk drive, a USB drive, or cloud storage such as Google Drive or Dropbox.
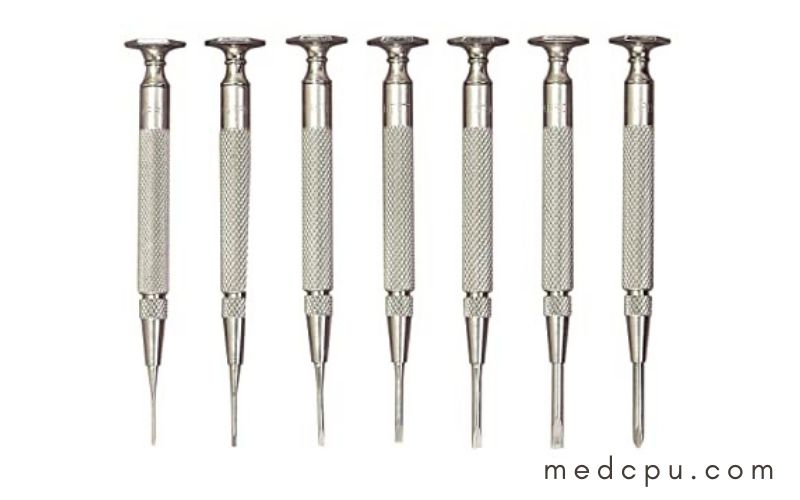
Step 2: You will need tools
Jeweler’s screwdriver and laptop with the hard drive.
Step 3: Safety Considerations
It is well-known that magnetic fields can erase electronic information. This will ensure your hard drive’s safety. It is true, but the magnets must be pretty strong to achieve this. While I recommend keeping magnets out of your work area, it is better to be safe than sorry. However, I wouldn’t worry too much about if a magnet from your refrigerator accidentally comes in contact with your laptop.
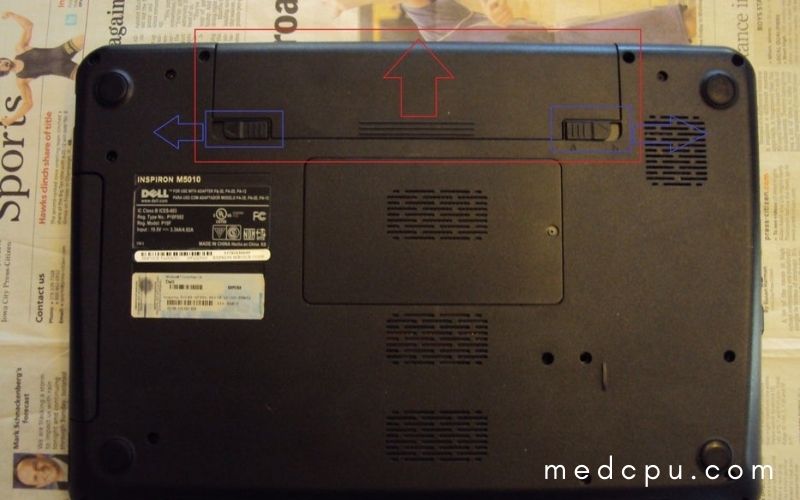
Step 4: Disconnect all Power Sources
Make sure your laptop is unplugged before you remove the battery. Disconnect all telephones, networks, USB cables, or other attached devices from your laptop.
Slide the tabs (blue Arrows) towards the outside, then push the battery (red Arrow) away from your computer. This is because even if the laptop is off during repairs on its inner components, if it is still connected to a power source (battery), it might turn back on due to short or mechanical jolt.
To remove any remaining charge, hold down the power button for 3 seconds.
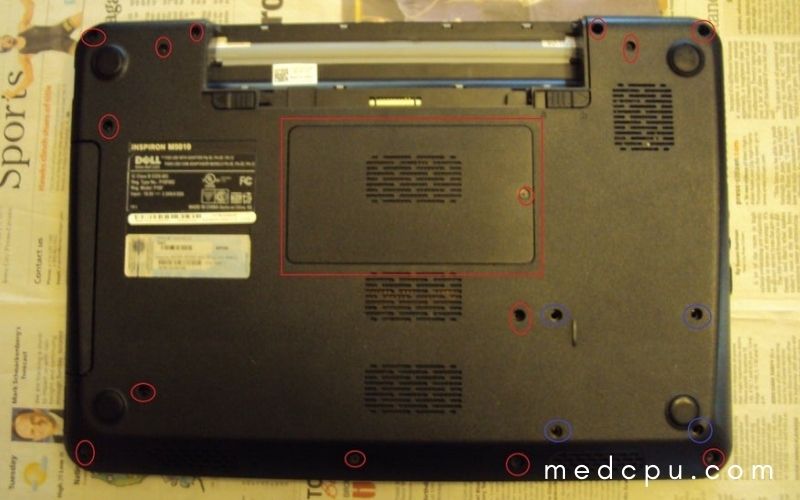
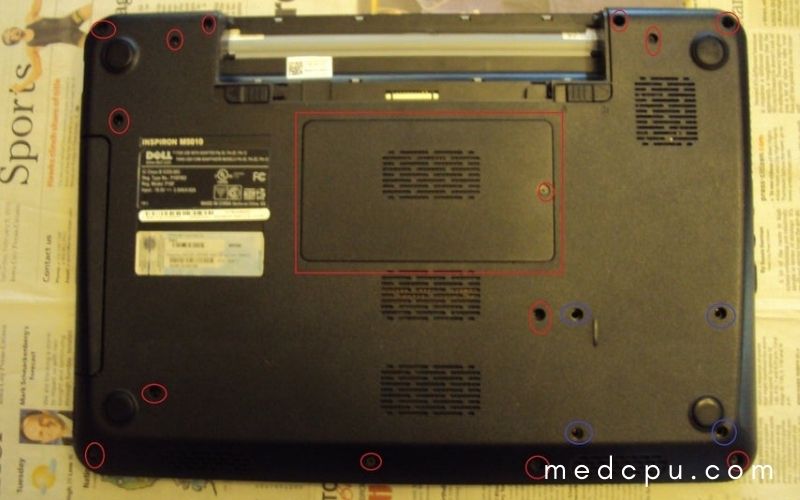
Step 5: Take out the screws of the main access panel
After you have verified that the laptop is fully powered down, you can start to disassemble it. Start by removing the red-circled screws. The screws marked in blue are those that hold the hard drive. After the red screws have been removed, you can remove the red cover.
The access panel can be found below the laptop. Sometimes it is on the side of your laptop. Rarely, the hard drive could be under your laptop’s motherboard. This type of drive can be difficult to remove, so calling an expert is a good idea.
Step 6: Take out any remaining screws
Take out the red-circled screws.
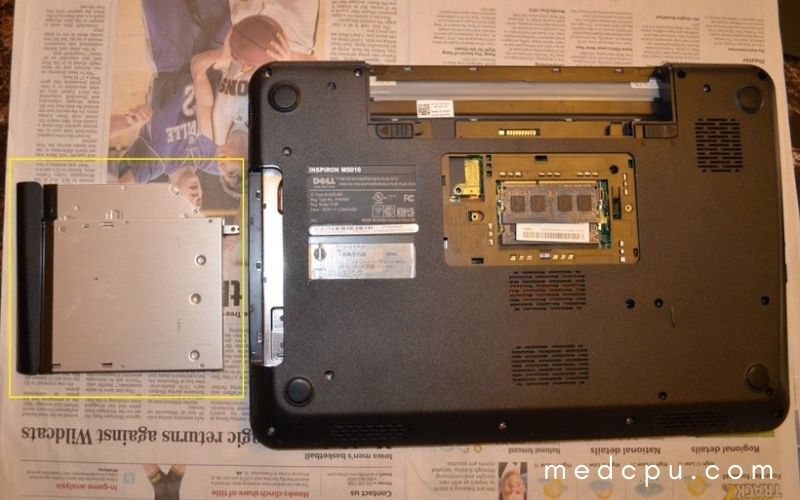
Step 7: Remove the CD or DVD reader
Simply pull the entire unit apart to remove the CD/DVD reader (outlined in yellow).
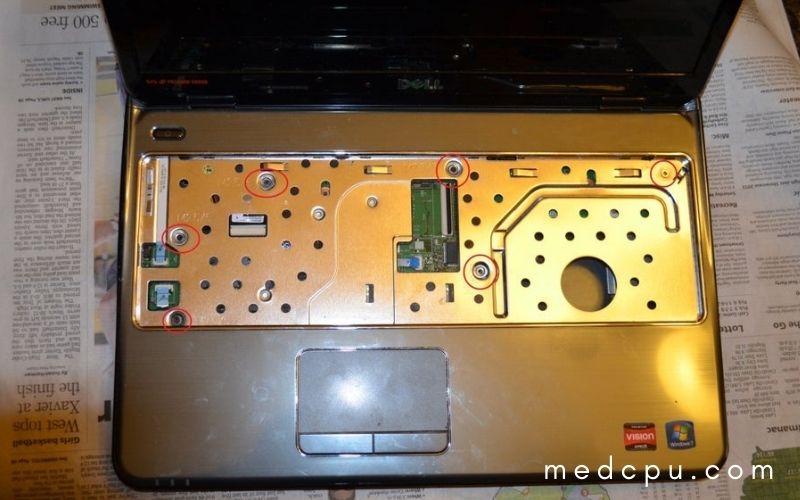
Step 8: Disconnect the Keyboard
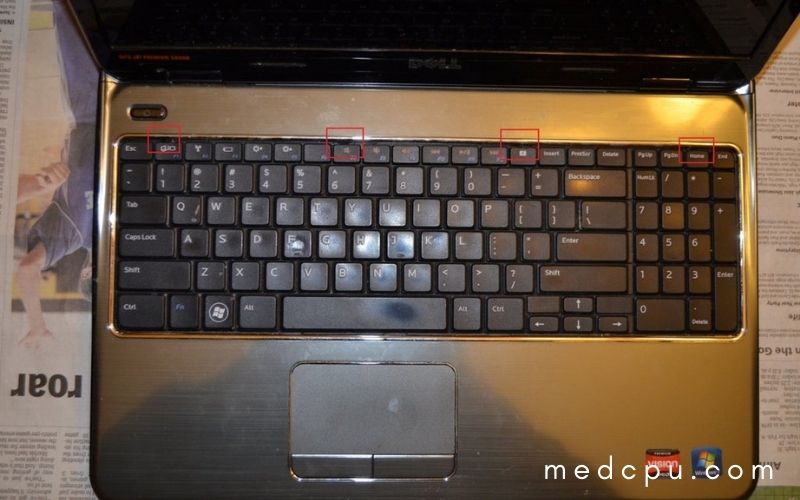
To remove the keyboard, you need to press the four tabs on the keyboard’s top (outlined in red) and then lift the keyboard. To reach the tabs, you will need to use a jeweler’s screwdriver. It is easier to press one tab at a time. Start at the corner and then lift the piece up on the keyboard.
Tabs are not part of the keyboard; they are part of the surrounding case. They protrude onto the keyboard to keep it in place.
Do not forcefully pull the keyboard up once it is released. Next, you will need to follow the following steps.
Step 9: Remove the Keyboard Cable
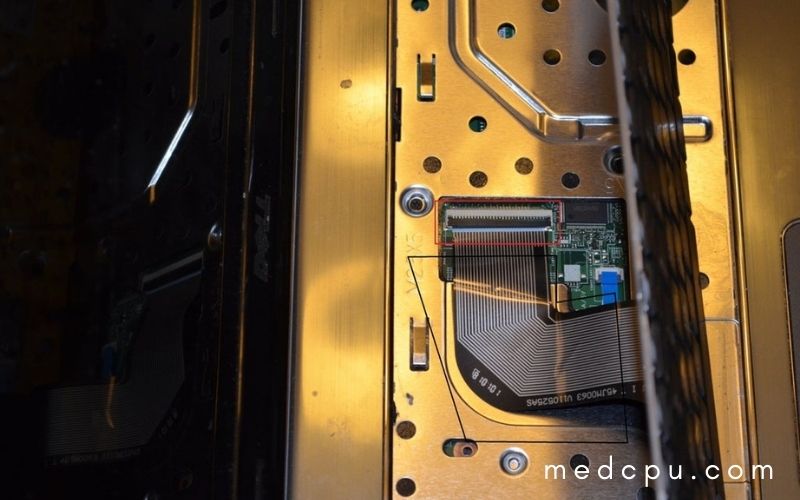
After removing the keyboard from the tabs, lift the keyboard up to expose the black-colored keyboard cable. It is extremely thin, so don’t try to pull it out. To remove the cable, lift up on the tab marked in red.
Step 10: Take out the strips
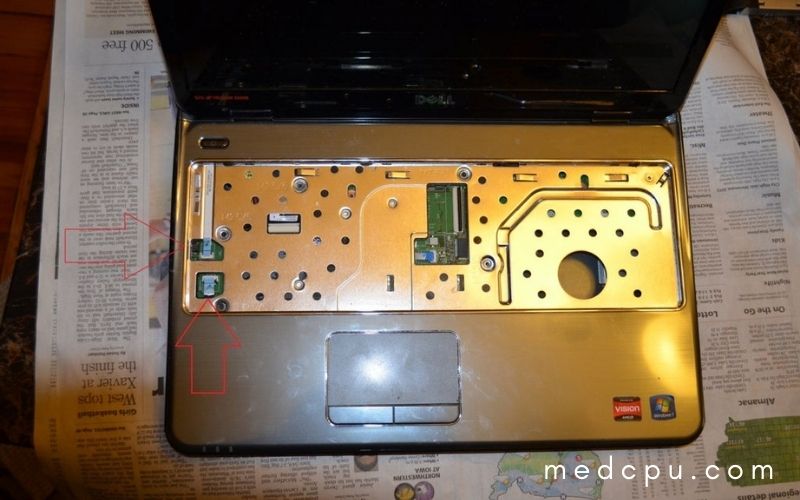
To access the hard drive, you will need to take off the plate shown here. To access the hard drive, first unhook the strips marked by red arrows. (See the next step).
Step 11: Remove Screws (Continued)
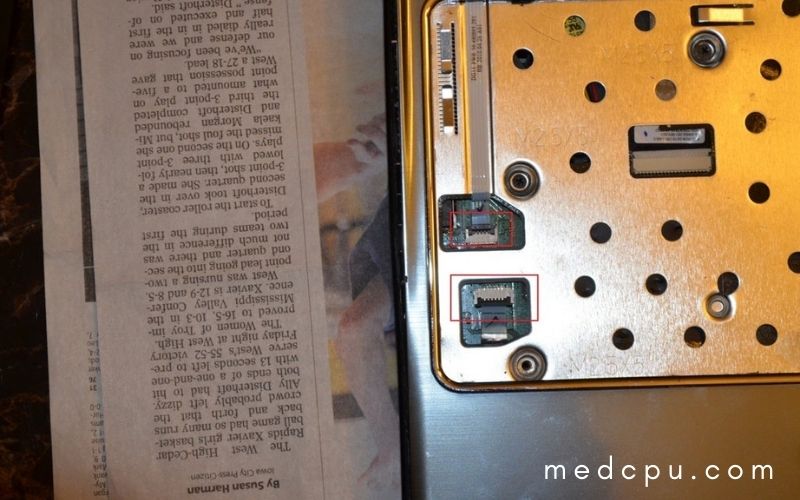
To remove the strips, you can lift the tabs of the black connector tabs (outlined red) in the same manner as the keyboard cable.
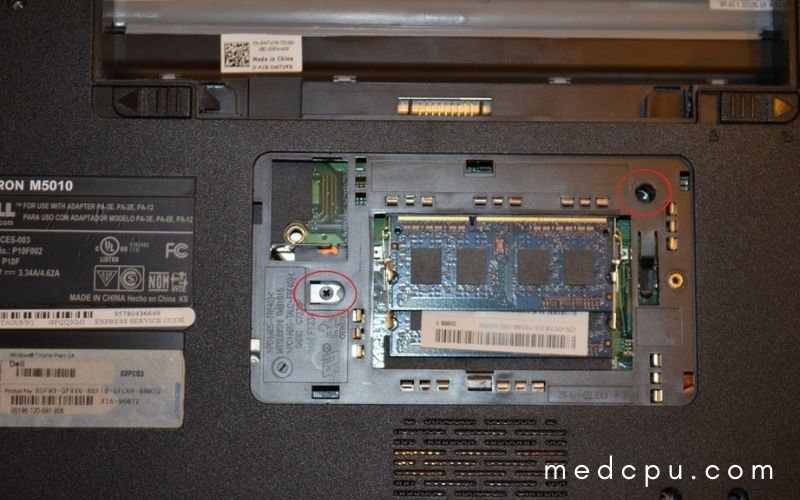
Step 12: Take out any remaining screws
Next, remove the screws securing the plate (circled red). Next, lift the plate and place it aside.
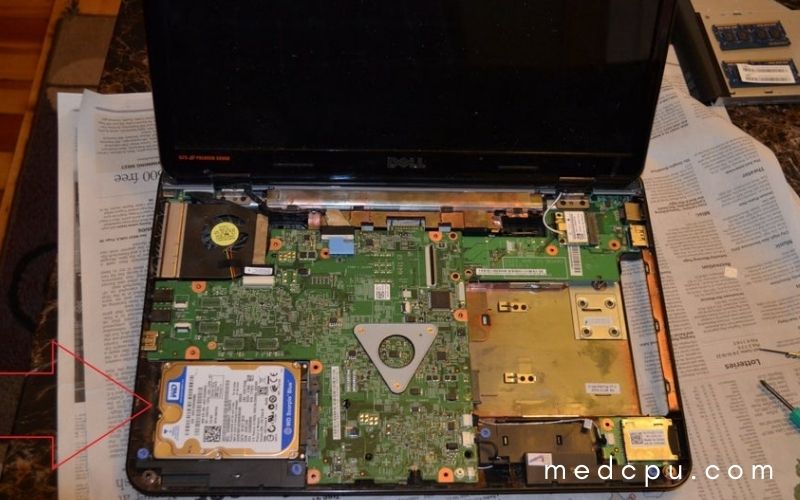
Step 13: Locate the Hard Drive
You are almost done! The red arrow indicates the hard drive. You will need to remove the screws securing it to your laptop. (See the next step).
Step 14: Remove Hard Drive Screws
It is now time to take out the screws in blue. These are the ones that we left in step 5. The hard drive can now be removed.
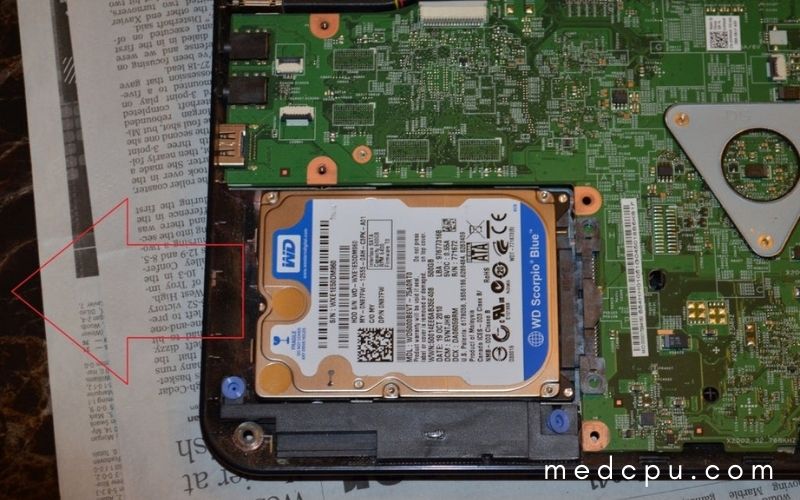
Step 15: Take out your hard drive
Finally, slide your hard drive in the direction indicated by the red arrow. Then, please remove it from the connection to the laptop and lift it out.
How to Recover Lost Data from Hard Drive Removal?
After erasing your hard drive, there is a small chance you might lose your files. How do you go about this? Perhaps you have formatted the drive and decided to use it as an outside, but before backing it up.
Recoverit Data Recovery premium data recovery software is designed to address such issues. This software is designed to recover files that you have lost in a variety of ways. It is easy to use. It doesn’t require you to be a genius or a geek to make it work.
Step 1: Select a location
Recoverit can be used to retrieve data from external drives. Simply connect the drive to your computer. If the drive you want to recover data from is external, connect it to your computer and launch Recoverit. You can also choose the drive from the first window of the software.
Any external drive will fall under the “External Devices“, while internal drives will be listed under “Hard Disk Drives“. Click “Start” to select the correct drive.
Step 2: Scanning the Location
The scan for data loss will begin. Recoverit allows you to choose file filters, making the recovery process easier. You can check the boxes corresponding to specific file types to recover only “jpg” or “doc” files.
Step 3: Recover and Preview Data
Recoverit will recover all files that you have checked the boxes. You can also click the “select all”, but this is only necessary if you wish to recover ALL of your files, not just a few.
Click on the “Recover” button to take the selected files out of your drive. You can then dump them wherever you like. Do not save files to the same drive that they were lost.
After recovering the hard drive’s data successfully, format the faulty hard drive and move the recovered data to another location.
When it comes to data losses, you should only worry about whether the fault is due to hardware damage. Recoverit can help you recover the lost data as well as formatted or deleted files if it is not the case.
This data recovery software is designed to scan hard drives and extract lost data from every sector. Recoverit is easy to use and so efficient that you could almost say it excels at data recovery.
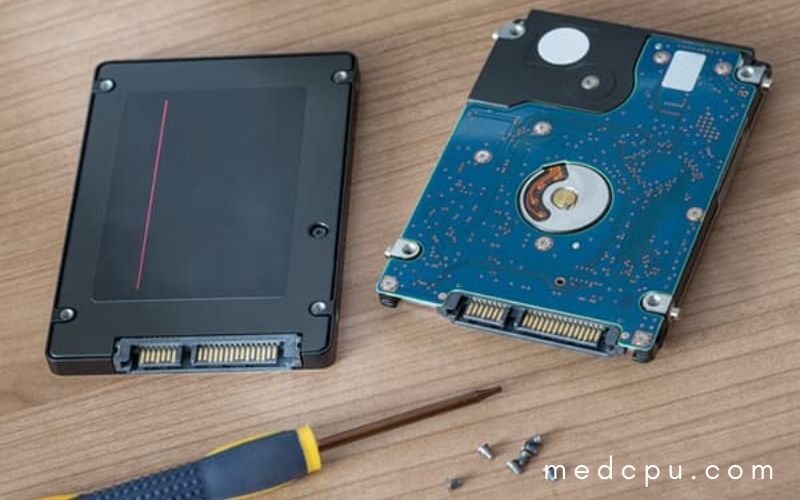
Overview of Laptop Hard Drives Parts
This is where things get more complicated and confusing. A hard drive, also called a hard disk or HDD, is a non-volatile memory device that stores, retrieves, and stores data on a computer. Non-volatile memory is a memory that is stored even when the computer is turned off.
Are you clear about all of that? You are. It is. If you are not a hard drive manufacturer, it is best to know only four of the most important.
Platters
These are the large circular disks that house your files. These platters are the most crucial component of your drive. Don’t scratch them! Don’t rush to remove the drive from your computer.
Spindle
This is what turns the platters and holds them in place. The speed at which data can be read or written to your drive is directly related to the rotational speed of the platter. When removing your drive, be careful not to damage the spindle. Without it, platters on the drive will fly around the room.
The Read/Write Arm
This little guy controls the movement of the read/write heads. The heads are the parts that read and write onto the platters. What happens if you pull the drive too hard or fast? It’s obvious.
Actuator
The actuator is your drive’s “manager”. It is a small but powerful motor that listens for instructions from your drive’s circuit board. For example, it controls the movement of the read/write arm and manages data transfer to and from platters.
The actuator is responsible for ensuring that the read/write head remains in the correct position. The actuator can be very sensitive so take extra care when you remove it.
FAQs
Does removing hard drive remove all data?
The data on a hard drive will not be deleted if it is removed from your computer. It will not be stored on that computer.
Read also: How To Replace Laptop Hard Drive And Reinstall Operating System?
Is it cheaper to replace a hard drive or buy a new computer?
Most common problems will require a reinstall or replace a component, such as a hard disk or power supply. This is usually less costly than purchasing a new computer and doesn’t take much labor.
How do you remove a hard drive from a laptop before recycling?
BEFORE You Begin.
STEP 1: Disconnect the hard drive from your computer.
STEP 2: Access platters and circuit boards on the hard drive.
STEP 3: Disconnect the read/write arm and scratch the platters using a screwdriver. This will destroy any stored data.
STEP 4: Remove the circuit board.
STEP 5: Recycle all internal components.
Where is harddrive located in laptop?
The laptop’s right or left side, usually the side opposite to the CD drive, will have a small cut-out section that can be removed from the computer’s side. This is your laptop’s hard drive.
Conclusion
We hope you found this article helpful and that you have a better understanding of the steps involved in removing a hard drive from a laptop. Let us know if there are other things about laptops or computers which make you scratch your head! We would love for our customers to feel empowered by their tech rather than intimidated by it all at once.
Read also: Best Laptops For Working From Home 2022

Eyal Ephrat serves as the co-founder and CEO of medCPU.com, where technology is making significant strides in the field of medicine. Through his experience in purchasing PC and laptop equipment and various other tech products, Eyal Ephrat contributes valuable insights to medCPU’s mission.