Apple has recently launched a new operating system called macOS 13 Ventura. Although the news was already out that the software will hit the market before, the excitement never ceases to amaze us.
Many people expected bigger things from the new operating system, such as coming up with a direct solution to the NTFS write support, boosting efficiency with new Mail improvements, and smoother performance.
After the launch of the new macOS Ventura, it was able to deliver the later part of the expectation, but the new operating system still has no full support for the NTFS formatted drives. What’s worse, it stops Mac end users from enabling NTFS write support manually. This brings us to a discussion of the possible solution. Of course, the discussion came to an end with a positive note in the form of iBoysoft NTFS for Mac.
iBoysoft NTFS for Mac: What It Is
Cross-platform data sharing always comes with its share of challenges, and the new macOS 13 Ventura is no exception. However, you do not have to worry anymore. We are here with software that will help you overcome those challenges.
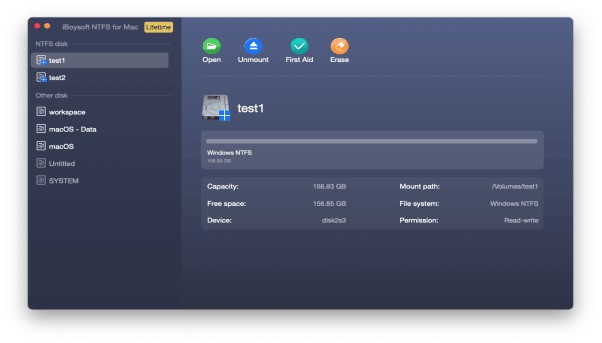
iBoysoft NTFS for Mac is a lightweight menu bar utility released by iBoysoft with a simple setup. It grants you full read-write access to your NTFS drives on Mac running macOS High Sierra, Mojave, Catalina, Big Sur, and Monterey as well as the latest macOS Ventura.
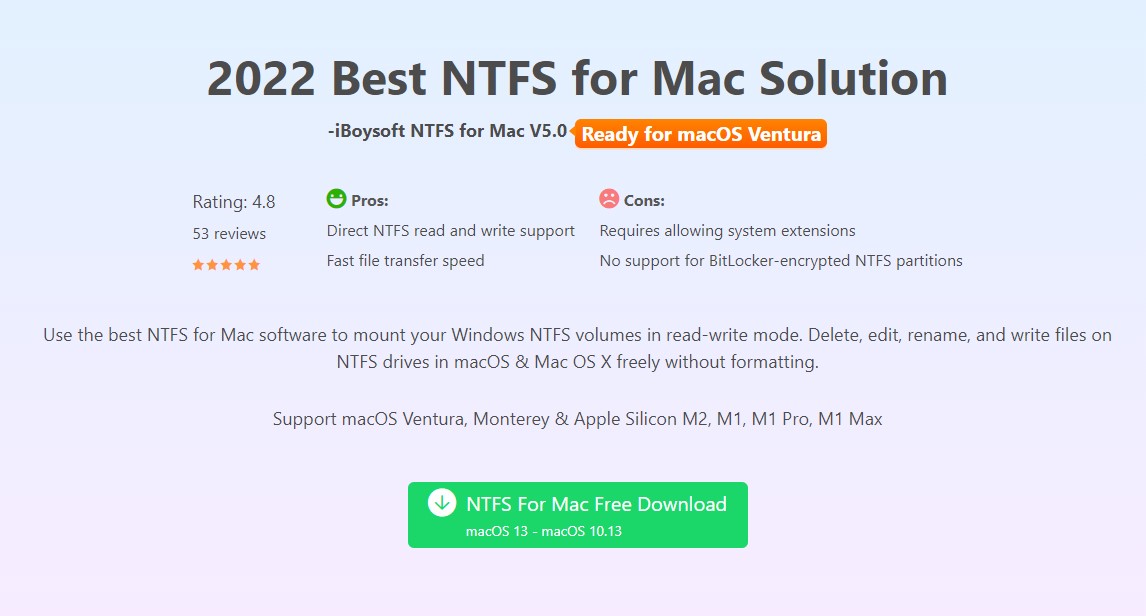
Once the software is installed in the system, it initiates its automount feature to mount Windows NTFS-formatted drives in read-write mode immediately. In other words, no need to get the inserted NTFS drive mounted manually, and you can begin to read, write, change, move, delete and share files saved on the NTFS drive with ease as long as the drive is successfully detected. Besides, the software also comes with a basic disk manager that helps you keep track of your drive’s health, perform NTFS drive erasure, and manage non-NTFS disks on macOS.
Why Choose iBoysoft NTFS for Mac?
Many reasons make us recommend this software as the first preference for your Mac to enable NTFS to write support on macOS Ventura. However, all the reasons can not be enumerated below. We have handpicked some of the most influential that most users consider while selecting an NTFS for software for their Mac.
1. Read/Write Support on macOS Ventura
This is the main reason why you should use Microsoft NTFS for Mac by iBoysoft in the first place. macOS Ventura still lacks the NTFS write support. Hence, by default, you are restricted to the read-only action as well. Although many NTFS for Mac utilities were put into the market in the name of high compatibility, some of them are not compatible with this new macOS.
Fortunately, iBoysoft NTFS for Mac employees advanced technologies and algorithms to offer high-quality read and write services to you. With Microsoft NTFS for Mac by iBoysoft, you get the freedom to use the NTFS drives on macOS 13 as you please.
2. Fast Transfer Speed
Fast Transfer speed is something that iBoysoft NTFS for Mac boasts about gallantly. Being a lightweight application, this small-size utility hardly uses any memory space. Hence, it allows the system to make that spec to good use, in this case, high transfer speed. The transfer speed is fast enough that you would never realize that you are using an NTFS drive but a native APFS or HFS+ drive.
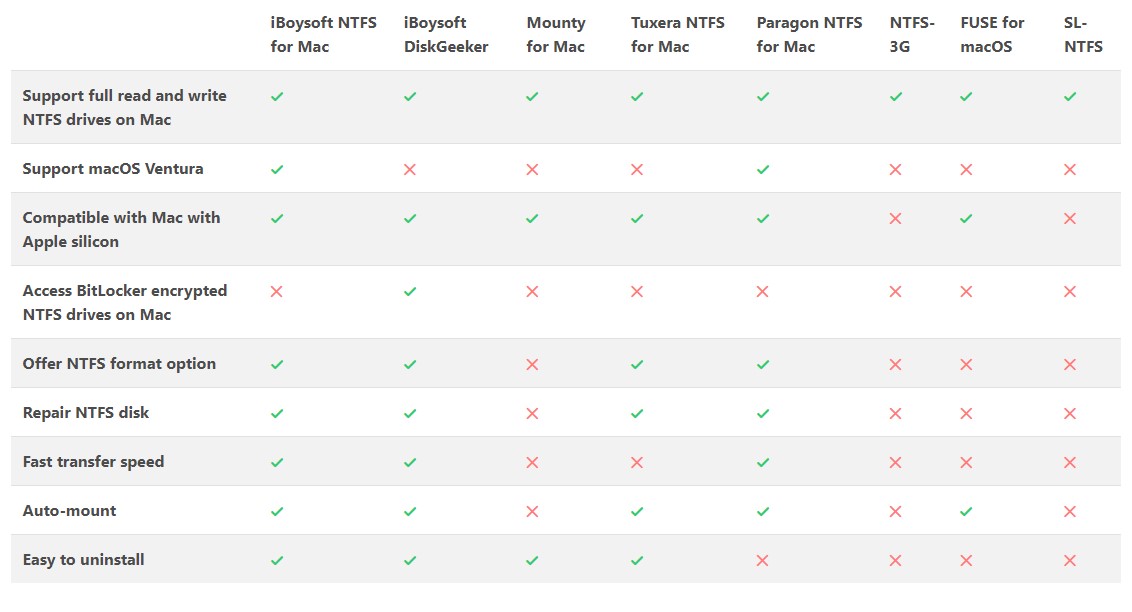
3. Manage Both NTFS and Non-NTFS Drives with a Few Clicks
Most NTFS for Mac tools manage the NTFS drives only. However, iBoysoft NTFS for Mac can manage both NTFS and non-NTFS drives easily. It has a built-in disk management tool that makes it possible for you to manage all the available drives attached to your Mac machine on the software interface.
- View disk information.
- Allow users to mount, unmount, open, and eject Microsoft NTFS disks.
- Check and repair the found errors on the NTFS drive. Here, two options will be listed in the pop-up when clicking the First Aid function. The Check disk option helps to check the NTFS disk errors but is limited to repairing these errors. Instead, the Repair disk option is available to check and repair NTFS disk errors.
- Format an NTFS formatted disk for quick data cleanup.
- Open other disks formatted with non-NTFS file systems and erase them to NTFS.
The Most Straightforward Way to Read and Write NTFS Drives on macOS Ventura
Since Apple has made some changes to the entire mount process of NTFS drives on macOS Ventura, reading and writing to an NTFS drive on this new operating system can be done by using a third-party NTFS for Mac application, formatting the NTFS drive to a Mac-compatible file system (data loss possibilities), and installing Windows on Mac to read and write to the NTFS drive in Windows directly (complexity of use).
Compared with another two methods, using an NTFS for Mac utility like iBoysoft NTFS for Mac that supports macOS Ventura will be the most straightforward way in terms of data loss prevention and simplicity. To proceed with the operation, the following procedure is necessary.
Step 1 Go to iboysoft.com to securely download iBoysoft NTFS for Mac and then complete the installation process according to the step-by-step instruction.

Step 2 Hook up the read-only NTFS hard drive to your Mac device running macOS Ventura and launch iBoysoft NTFS for Mac.
Step 3 Read and write to your NTFS drive that has been mounted in read-write mode automatically by the iBoysoft NTFS for Mac solution.
Final Words
For anyone seeking reliable and ease-to-use NTFS for macOS Ventura program, iBoysoft NTFS for Mac is worth having a try. If you have decided to use this utility, share your experience after using it. We are sure our other readers will certainly benefit from your response. Thank you for reading the article on medCPU.
>>> Read more: How to take a screenshot on a Mac

Eyal Ephrat serves as the co-founder and CEO of medCPU.com, where technology is making significant strides in the field of medicine. Through his experience in purchasing PC and laptop equipment and various other tech products, Eyal Ephrat contributes valuable insights to medCPU’s mission.