Knowing how to snap screenshots or record on-screen activity is a vital skill to acquire. This is especially handy for people who work remotely from home. It is straightforward to snap and save screenshots if you have a Dell laptop or desktop computer. Once you master the procedure, you can use it on nearly any computer because it is practically universal. In this post, MedCPU will review the keyboard shortcuts that work on most Dell desktop and laptop computers and how to create screenshots using the Windows Snipping Tool.
What is a screenshot?
A screenshot, or screen capture, is a picture you take of your computer screen. The screenshot is immediately transferred to your computer’s clipboard after being born. The snapshot may then be pasted into a document, email, file, or picture editor (Paint, for example). A different option is to save the screenshot as a file and then insert it as a picture into a document, email, another file, or image editor.
A screenshot is a fantastic tool for both personal and professional usage. Therefore, this is true. Please continue reading if you are using a Dell laptop or computer and are unsure how to record your screen on a Dell device.
How to take a screenshot on a Dell laptop
Using Print Screen Key
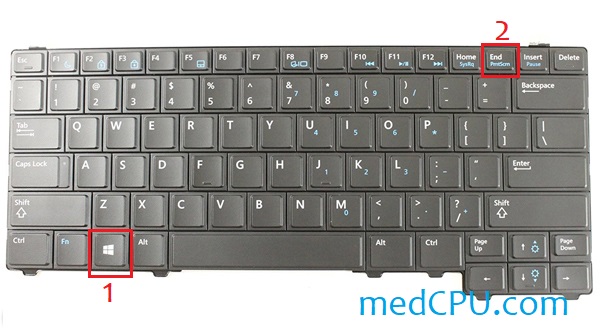
Step 1: At the top of your keyboard, locate the ⎙ PrtScr key. You may quickly and conveniently capture a screenshot on a Dell by pressing the Print Screen key. This key is situated next to the Del key on the top row of keys on the right of most Dell keyboards. The Print Screen key could also be a function key on some Dell keyboards (e.g., F10). Several other acronyms may be used to mark the Print Screen key, including PrtScn, PrntScrn, and PrtSc.
Step 2: Use ⊞ Win+⎙ PrtScr to screenshot your entire screen. On a Dell, various keyboard shortcuts capture different screenshots, and the combination you need to utilize may change depending on the Dell model. Remember that on some Dell computers, the shortcut Win+PrtScr may only record a single window in place of the entire screen.
To record your entire screen using a Dell tablet, simultaneously click the volume down and Windows logo buttons. You may need to use Fn+End on some Dell computers to take a screenshot instead.
Step 3: To record only your active windows, use “PrtScr.”
On some Dell computers, pressing the PrtScr button will only record the open windows; the taskbar, backdrop, and any extra items won’t be recorded.
Step 4: Take a screenshot of just one window with Alt+PrtScr.
Click or press on the window you wish to capture, then hold down Alt and PrtScr. Only the current window will be charged, with nothing else on the screen. Specific Dell computers utilize the keys Win+PrtScr or Fn+PrtScr to capture just one window.
Step 5: On a Dell, the screenshot you capture will typically be saved to your clipboard rather than immediately saved as an image file. Open an image editing program, such as Microsoft Paint, then press Ctrl+V to retrieve the screenshot. The screenshot will then be pasted into a new picture window.
On a Dell tablet, a screenshot is immediately saved to the Pictures folder. The Win+PrtScr keyboard shortcut saves screenshots as picture files rather than copying them to the clipboard in various versions of Windows. Open File Explorer, go to Pictures and choose Screenshots to find them.
Using Snipping Tool
Even Dell computers come pre-installed with a Snipping Tool that enables users to take screenshots in various forms, just like any other desktop PC or laptop. Learn how to use the Snipping Tool to take screenshots by reading the instructions below:
Step 1: Type “snipping tool” into the Windows search box. Select the relevant result that pops up on your screen by clicking.
Step 2: As soon as the Snipping Tool launches, you will notice several screenshot capture choices, editing tools, and other features.
- Free-form Snip: make a selection of any form, and the program will generate a screenshot from it.
- Rectangular Snip: This lets you pick a rectangle area for a screenshot.
- Window Snip: captures a selected window.
- Full-screen Snip: captures the entire screen.
Step 3: Select “Save Snip” from the menu after taking your screenshot. Use the Save As box to give your screenshot a name, pick a file type, and specify a location. You may easily share a snip by selecting a sharing option after clicking the arrow adjacent to the Send Snip button.
The URL appears at the bottom of a screenshot taken of a browser window if it is saved as an HTML file. Click the Options tab, uncheck Include URL below snips (HTML only), and then click OK to stop this from happening.
Step 4: If you’d like, annotate or amend your clip. You may use the Pen and Highlighter buttons to annotate your snip with drawings, highlight specific areas, and capture standard screenshots. Click Edit while your snapshot is open, then choose Edit with Paint 3D to make more modifications.

>>> Read more: Dell vs Lenovo laptop Which better for you
Using Screen Capturing Software
TweakShot Screen Capture
Although all of the aforementioned built-in techniques are simple to use and quick to complete, they fall short when capturing scrolling screenshots, entire screens, and other types of screenshots. Because of this, we urge all of our users to utilize a reputable screen recorder program like TweakShot Screen Capture.
Step 1: TweakShot Screen Capture may be downloaded, installed, and launched on Windows. The most recent Windows OS versions and the program work together quite well.
Step 2: To view the timeline of TweakShot, double-click the Big-Eye icon once it has launched.
Step 3: Numerous functions, including capture region, single window, full screen, scrolling window, record on-screen activity, color picker, and more, are available in the timeline.
Step 4: Choose any tools according to your preference and take snapshots on your Dell Laptop/Computer. Once satisfied, save the screenshot/videos to the desired location.
Markup Hero
Markup Hero is a straightforward but effective program that lets you capture screenshots and modifies and annotates them while you’re on the move. If you want to choose an alternative that gives you a more extensive selection of options to work with, you should use it. Additionally, you may filter, add categories, and organize your photographs using different folders.
Step 1: You must first download the Markup Hero application. You don’t even have to register anywhere because it’s free. All major operating systems, including Windows, Chrome, Mac, and Linux, support Markup Hero flawlessly.
Step 2: To begin the installation procedure after downloading Markup Hero, browse to the ‘Downloads’ folder on your laptop or computer and double-click on the.exe file.
Step 3: You may capture a screenshot of all or a section of your screen with Markup Hero. This program will send the screenshot to the internet after you’ve charged it. The tools provided by Markup Hero may be used to highlight, annotate, and alter your image. Some of the things you can accomplish using Markup Hero are as follows:
- Take a screenshot or upload documents like PDFs, Google Docs, or Slides.
- Easily share screenshots with pals by organizing them.
- Create a presentation by including numerous pages and combining screenshots.
- Make screenshots private to you or public for friends by changing their permissions.
- Add markup and annotations, such as arrows, text boxes, highlights, colors, ovals, and a wide variety of other things.
Conclusion
There may be several ways to take screenshots on your Dell laptop or computer, but if you want to, many rich alternatives enable you to do this and more. Accessing, editing, annotating, and sharing your photos appear simple with the aid of this program. You now know how to take a screenshot on a Dell laptop; give it a shot and decide for yourself whether it’s worthwhile.
Watching Video:

Eyal Ephrat serves as the co-founder and CEO of medCPU.com, where technology is making significant strides in the field of medicine. Through his experience in purchasing PC and laptop equipment and various other tech products, Eyal Ephrat contributes valuable insights to medCPU’s mission.