Astro is a well-known company that has long provided consumers with a wide range of gaming accessories. All of their gaming accessories are designed to provide consumers with a variety of benefits when they play their favorite games. You have just gotten your brand-new Astro A40/A50 gaming headset. You must first configure it before you can use it. So, how to set up Astro A40 on a PC? To make installation as simple as possible, we (medCPU) have produced a step-by-step guide for each platform: PC, PS4, and Xbox One.
Required components:
- A PC or Mac.
- The micro USB cable.
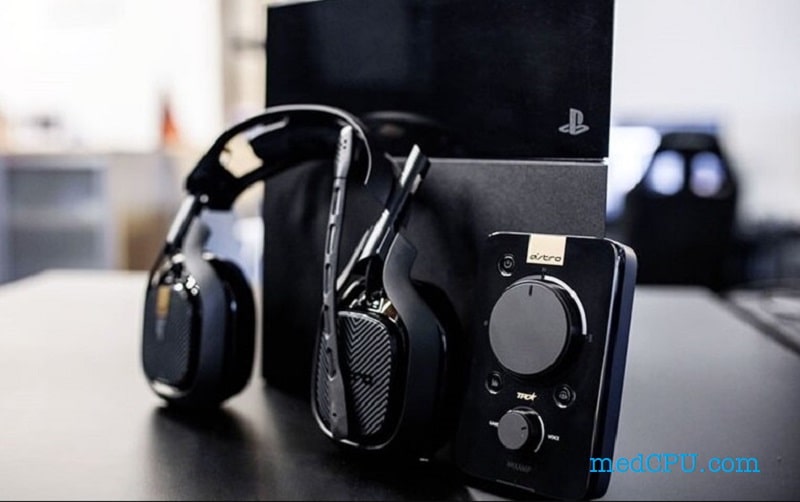
- The base station/AMP (charging dock).
- A40/A50 headset (note: the headset must be fully charged before the first use).
Connecting to a Computer/Mac
- Toggle the PC mode switch on the rear of the base station.
- Connect the base station to the PC/Mac using the provided USB cord to power it.
- Place the headset in the base station and align the microphone with the microphone slot (the microphone should be folded).
- When the headset is charging, the LED indicator will turn orange. If it does not, re-insert the headset into the base station. The connection is successful if the base station displays the charge status.
- When all four battery status lights illuminate, the headset is completely charged.

How to setup astro A40 on PC
Configure the sound settings on your PC/Mac appropriately so that you can utilize the headset to its full potential. If you have a Windows PC, follow the procedures for Windows, and if you have an Apple Mac, follow the steps for macOS.
For Windows
- Go to Start, then Control Panel, and finally Sound.
- A sound choices menu will display. Navigate to the Playback Devices section.
- Select ASTRO A40/A50 Game, then right-click once to make it the default device.
- Select ASTRO A40/A50 Voice, then click once with your right mouse button to make it the default communication device.
- Navigate to the Recording Devices section.
- Select ASTRO A40/A50 Voice, then right-click once to make it the default communication device.
For MacOS
- Navigate to the Settings menu. Choose sound.
- Select ASTRO A40/A50 Game from the Output menu.
- Select ASTRO A40/A50 Voice from the Input menu.
>>> Read more: How To Clean Thermal Paste Off CPU Quickly And Safely?
How to use Astro A40 on a PC without MixAmp?
The thing with MixAmp is that it provides the standard controls that you’d expect to find with a headset. However, you must devise a method of accomplishing this without the usage of a MixAmp.
To do this, you will want two distinct cables: an A40 inline cable and a PC splitter wire. The A40 inline cable, often known as the mute cable, is a cable that allows users to quiet an ongoing speech connection via their headset.
The problem with this cable is that it has two ends. The cable’s one end connects directly to the headset (5 poles), while the other pole connects to the MixAmp or the PC splitter wire (4 poles).
The splitter cable, on the other hand, is something that was expressly developed to assist customers in connecting their headset straight to their PC without the usage of the MixAmp. The splitter cable, often known as the Y splitter, is absolutely required for all of this to operate.
Having both of these wires should allow you to utilize your headset without MixAmp. This will essentially allow you to connect your A40 headset directly to your PC via your sound card. As a result, no MixAmp is required for the procedure.
Will the sound quality suffer as a result?
The majority of consumers that switched from the MixAmp to the splitter cable observed no difference at all. This suggests that the headset’s sound quality did not suffer much. As a result, you should not have to worry about sacrificing anything by employing this strategy.
Conclusion
This guide will teach you all you need to know about how to setup Astro A40 on a PC. Make sure to read all of the facts stated in the post so you don’t miss anything vital!

Eyal Ephrat serves as the co-founder and CEO of medCPU.com, where technology is making significant strides in the field of medicine. Through his experience in purchasing PC and laptop equipment and various other tech products, Eyal Ephrat contributes valuable insights to medCPU’s mission.